How to clear the crushing cavity of the HP cone crusher
What to do after a HP cone crusher stops
Should the HP cone crusher stop under load, no attempt should be made to start the HP cone crusher again until the entire crushing cavity has been cleared.
Attempting to start the HP cone crusher with the cavity full of material may result in serious damage to the HP cone crusher and HP cone crusher motor or engine.
Some of the reasons a HP cone crusher stops under load are as follows:
• HP cone crusher drive motor or engine stopped because of power failure.
• Too much feed entering the crushing cavity causing the HP cone crusher to stall.
• Discharge conveyor stopped, allowing discharging material to back up and plug the HP cone crusher from underneath.
• The gyrating crushing action of the head causes the material caught between the mantle and bowl liner on the closed side to tip and raise the adjustment ring a small amount and stall the HP cone crusher.
• On occasion an oversize piece of "tramp iron" can become caught, or wedged between the crushing members and cause the HP cone crusher to stall.
Under no circumstances enter the crushing cavity when a piece of tramp iron is wedged between the bowl liner and mantle.
To clear the HP cone crusher of plugged material, or to remove tramp iron wedged between the bowl liner and mantle, always use the hydraulic clearing system.
Clearing crushing cavity procedures as follows:
1. Stop the feed to the HP cone crusher.
2. Shut the power off to the HP cone crusher motor as quickly as possible. Lock out and tag the machinery.
3. Warn or inform personnel of what is occurring.
4. Check the oil level in the sight gauge on the side of the hydraulic power unit.
5. Be sure there is proper clearance above and around the HP cone crusher.
6. Check that the hydraulic power unit is on.
7. Turn the HP cone crusher cavity selector switch on the operator control cabinet to clear.
Caution
One of the most dangerous operations around a HP cone crusher is the removal of tramp iron that has jammed in the crushing chamber.
Extremely severe injuries can occur by trying to remove tramp iron. Always use the hydraulic cavity clearing system to remove tramp material.
Do not simply try to loosen the tramp with a pry bar. Severe personal injury could result.
8. When the safety blocks have been properly installed, lower the adjustment ring so that the clamping/clearing cylinders rest on top of the safety blocks.
9. Turn the HP cone crusher cavity selector switch on the operator control cabinet to off.
10. With the adjustment ring in the raised position and the safety blocks properly installed, jog the HP cone crusher by applying short spurts of power to the HP cone crusher drive motor to clear the crushing cavity.
Do not place feet or hands on the clamping/clearing cylinders, accumulators, in the space between the adjustment ring and main frame; or any part of your body between the cylinders and the main frame lower flange.
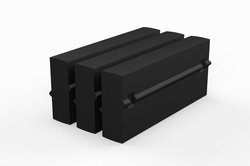
Always use the "safety blocks" when the adjustment ring is in the raised position and material is being removed from the crushing chamber.
These safety blocks are used to protect hands, arms, equipment, etc. from being caught between the crushing members, in the event of a hydraulic failure.
11. Make sure the adjustment ring is in its raised position and the safety blocks are in position between the bottom of three equally spaced clamping/clearing cylinders and on top of the cylinder mounting ribs on the main frame flange.
Then stand on top of the adjustment ring and use a long pipe, wooden pole or a pry bar to dislodge the compacted material in the crushing chamber until it falls out.
Caution:
Under no circumstances should the HP cone crusher be started and crushing resumed with the adjustment ring in the raised position.
Serious personal injury and severe damage to the HP cone crusher could result.
12. Jog the HP cone crusher a few times as described in step 10 and check for free head movement in the HP cone crusher. Do not stand on or near HP cone crusher during the jogging procedure.
13. If the head is still not free, repeat steps 10 through 12, several times or as long as material continues to discharge from the crushing cavity.
14. After the crushing cavity has been cleared, turn the HP cone crusher cavity selector switch on the operator control cabinet to clear to "raise" the adjustment ring. Then remove the three safety blocks.
15.Turn the HP cone crusher cavity selector switch to crush. The adjustment ring will now lower and return to its seating surface on the main frame seat liner.
16. Resume normal crushing.


